Android TableLayout 將視圖分為行和列。將使用<TableRow>元素建立行在表中。每一行都有零個或多個單元,每個單元可以容納一個 View 對象。
TableLayout 容器不顯示自己的行,列或單元格的邊界線。
TableLayout 屬性
以下是具體TableLayout 的重要屬性:
| 屬性 | 描述 |
|---|---|
| android:id | 這是佈局的唯一標識ID。 |
| android:collapseColumns | 這指定從零開始的索引折疊的列。列索引必須用逗號分隔: 1, 2, 5. |
| android:collapseColumns | 列從零開始的索引萎縮。列索引必須用逗號分隔:1, 2, 5. |
| android:stretchColumns | 列從零開始的索引伸展。列索引必須用逗號分隔: 1, 2, 5. |
例子
這個例子將通過簡單的步驟顯示了如何使用表佈局創建Android應用程式。按照下麵的步驟創建Android 應用程式專案 - TableLayout 示例:
| Step | 描述 |
|---|---|
| 1 | 使用Eclipse IDE創建Android應用程式,在包com.zaixian.tablelayout下創建一個應用示例專案:RelativeLayout |
| 2 | 修改res/layout/activity_main.xml 檔的默認內容,新增包括一些小部件的表格佈局。 |
| 3 | 定義所需的常量在res/values/strings.xml檔中 |
| 4 | 運行該應用程式啟動Android模擬器,並確認應用運行的結果。 |
以下是內容修改主activity 檔 src/com.zaixian.tablelayout/MainActivity.java。這個檔可以包括每個生命週期的方法。
package com.zaixian.tablelayout;

import android.os.Bundle;
import android.app.Activity;
import android.view.Menu;

public class MainActivity extends Activity {

    @Override
    protected void onCreate(Bundle savedInstanceState) {
        super.onCreate(savedInstanceState);
        setContentView(R.layout.activity_main);
    }

    @Override
    public boolean onCreateOptionsMenu(Menu menu) {
        getMenuInflater().inflate(R.menu.main, menu);
        return true;
    }

}
以下是 res/layout/activity_main.xml 檔的內容:
<TableLayout xmlns:android="http://schemas.android.com/apk/res/android"
   android:layout_width="fill_parent"
   android:layout_height="fill_parent">
   <TableRow>
      <Button
         android:id="@+id/backbutton"
         android:text="Back"
         android:layout_width="wrap_content"
         android:layout_height="wrap_content" />
   </TableRow>
   <TableRow>
      <TextView
         android:text="First Name"
         android:layout_width="wrap_content"
         android:layout_height="wrap_content"
         android:layout_column="1" />
         <EditText
         android:width="100px"
         android:layout_width="wrap_content"
         android:layout_height="wrap_content" />
   </TableRow>
   <TableRow>
      <TextView
         android:text="Last Name"
         android:layout_width="wrap_content"
         android:layout_height="wrap_content"
         android:layout_column="1" />
         <EditText
         android:width="100px"
         android:layout_width="wrap_content"
         android:layout_height="wrap_content" />
   </TableRow>
</TableLayout>
以下是 res/values/strings.xml 內容定義兩個常量:
<?xml version="1.0" encoding="utf-8"?>
<resources>

   <string name="app_name">TableLayout</string>
   <string name="action_settings">Settings</string>

</resources>
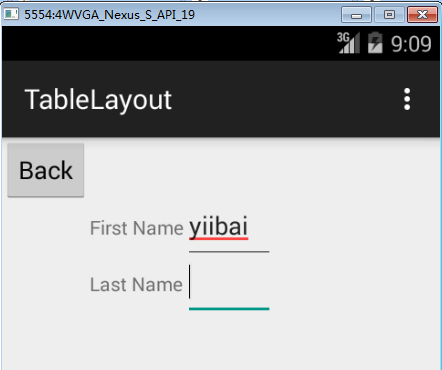
讓我們嘗試運行 RelativeLayout 應用程式,假設創建AVD同時設置好環境。從Eclipse中打開專案的活動檔運行應用程式,然後從Eclipse圖示工具欄上單擊“Run” 圖示  。 Eclipse AVD安裝應用程式並啟動它,如果設置和應用都沒有問題,它會顯示以下模擬器窗口:
上一篇:
Android RelativeLayout
下一篇:
Android AbsoluteLayout