一些要用到的技術:
- Spring 3.2.8.RELEASE
- Spring Security 3.2.3.RELEASE
- Eclipse 4.2
- JDK 1.6
- Maven 3
- Tomcat 7 (Servlet 3.x)
一些需要注意的事項:
-
本教程使用 WebApplicationInitializer 來自動加載 Spring 上下文加載器,這些僅在 Servlet 3.X 容器中支持,例如:Tomcat7和 Jetty8。
-
由於我們使用了WebApplicationInitializer,所以不需要web.xml配置檔。
-
Spring Security注釋在舊版本的Servlet容器2.x中支持,例如:Tomcat6. 如果您使用經典的XML檔來加載Spring上下文,本教程仍然能夠部署在Servlet容器2.X 中,例如,Tomcat6。
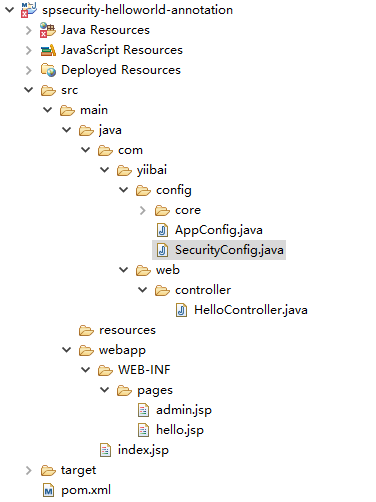
2. 目錄結構
3. Spring Security依懶
要使用Spring security, 我們需要 spring-security-web 和 spring-security-config.
<properties>
		<jdk.version>1.6</jdk.version>
		<spring.version>3.2.8.RELEASE</spring.version>
		<spring.security.version>3.2.3.RELEASE</spring.security.version>
		<jstl.version>1.2</jstl.version>
	</properties>

	<dependencies>

		<!-- Spring 3 dependencies -->
		<dependency>
			<groupId>org.springframework</groupId>
			<artifactId>spring-core</artifactId>
			<version>${spring.version}</version>
		</dependency>

		<dependency>
			<groupId>org.springframework</groupId>
			<artifactId>spring-web</artifactId>
			<version>${spring.version}</version>
		</dependency>

		<dependency>
			<groupId>org.springframework</groupId>
			<artifactId>spring-webmvc</artifactId>
			<version>${spring.version}</version>
		</dependency>

		<!-- Spring Security -->
		<dependency>
			<groupId>org.springframework.security</groupId>
			<artifactId>spring-security-web</artifactId>
			<version>${spring.security.version}</version>
		</dependency>

		<dependency>
			<groupId>org.springframework.security</groupId>
			<artifactId>spring-security-config</artifactId>
			<version>${spring.security.version}</version>
		</dependency>

		<!-- jstl for jsp page -->
		<dependency>
			<groupId>jstl</groupId>
			<artifactId>jstl</artifactId>
			<version>${jstl.version}</version>
		</dependency>

	</dependencies>
4. Spring MVC Web應用程式
一些簡單的控制器,如下所示:
- 如果 URL = /welcome 或 / , 返回 hello 頁面;
- 如果 URL = /admin , 返回 admin 頁面;
- 如果 URL = /dba , 返回admin 頁面;
接下來,我們將保證 /admin 和 /dba URLs.
package com.zaixian.web.controller;

import org.springframework.stereotype.Controller;
import org.springframework.web.bind.annotation.RequestMapping;
import org.springframework.web.bind.annotation.RequestMethod;
import org.springframework.web.servlet.ModelAndView;

@Controller
public class HelloController {

	@RequestMapping(value = { "/", "/welcome**" }, method = RequestMethod.GET)
	public ModelAndView welcomePage() {

		ModelAndView model = new ModelAndView();
		model.addObject("title", "Spring Security Hello World");
		model.addObject("message", "This is welcome page!");
		model.setViewName("hello");
		return model;

	}

	@RequestMapping(value = "/admin**", method = RequestMethod.GET)
	public ModelAndView adminPage() {

		ModelAndView model = new ModelAndView();
		model.addObject("title", "Spring Security Hello World");
		model.addObject("message", "This is protected page - Admin Page!");
		model.setViewName("admin");

		return model;

	}

	@RequestMapping(value = "/dba**", method = RequestMethod.GET)
	public ModelAndView dbaPage() {

		ModelAndView model = new ModelAndView();
		model.addObject("title", "Spring Security Hello World");
		model.addObject("message", "This is protected page - Database Page!");
		model.setViewName("admin");

		return model;

	}

}
兩個 JSP 頁面如下所示:
<%@page session="false"%>
<html>
<body>
	<h1>Title : ${title}</h1>
	<h1>Message : ${message}</h1>
</body>
</html>
<%@taglib prefix="c" uri="http://java.sun.com/jsp/jstl/core"%>
<%@page session="true"%>
<html>
<body>
	<h1>Title : ${title}</h1>
	<h1>Message : ${message}</h1>

	<c:if test="${pageContext.request.userPrincipal.name != null}">
		<h2>Welcome : ${pageContext.request.userPrincipal.name}
                 | <a href="<c:url value="/logout" />" > Logout</a></h2>
	</c:if>
</body>
</html>
5. Spring Security配置
5.1創建 Spring Security 配置檔,並 @EnableWebSecurity 注解,如下代碼所示:
package com.zaixian.config;

import org.springframework.beans.factory.annotation.Autowired;
import org.springframework.context.annotation.Configuration;
import org.springframework.security.config.annotation.authentication.builders.AuthenticationManagerBuilder;
import org.springframework.security.config.annotation.web.builders.HttpSecurity;
import org.springframework.security.config.annotation.web.configuration.EnableWebSecurity;
import org.springframework.security.config.annotation.web.configuration.WebSecurityConfigurerAdapter;

@Configuration
@EnableWebSecurity
public class SecurityConfig extends WebSecurityConfigurerAdapter {

	@Autowired
	public void configureGlobal(AuthenticationManagerBuilder auth) throws Exception {
	  auth.inMemoryAuthentication().withUser("zaixian").password("123456").roles("USER");
	  auth.inMemoryAuthentication().withUser("admin").password("123456").roles("ADMIN");
	  auth.inMemoryAuthentication().withUser("dba").password("123456").roles("DBA");
	}

	@Override
	protected void configure(HttpSecurity http) throws Exception {

	  http.authorizeRequests()
		.antMatchers("/admin/**").access("hasRole('ROLE_ADMIN')")
		.antMatchers("/dba/**").access("hasRole('ROLE_ADMIN') or hasRole('ROLE_DBA')")
		.and().formLogin();

	}
}
這等同於以下 Spring Security xml 檔:
<http auto-config="true">
		<intercept-url pattern="/admin**" access="ROLE_ADMIN" />
		<intercept-url pattern="/dba**" access="ROLE_ADMIN,ROLE_DBA" />
	</http>

	<authentication-manager>
	  <authentication-provider>
	    <user-service>
		<user name="zaixian" password="123456" authorities="ROLE_USER" />
		<user name="admin" password="123456" authorities="ROLE_ADMIN" />
		<user name="dba" password="123456" authorities="ROLE_DBA" />
	    </user-service>
	  </authentication-provider>
	</authentication-manager>
5.2 創建一個擴展 AbstractSecurityWebApplicationInitializer 的一個類, 它將會自動地加載 springSecurityFilterChain 。
package com.zaixian.config.core;

import org.springframework.security.web.context.AbstractSecurityWebApplicationInitializer;

public class SpringSecurityInitializer extends AbstractSecurityWebApplicationInitializer {
   //do nothing
}
這等同於以下 Spring Security 中的 web.xml 檔,如下:
<filter>
		<filter-name>springSecurityFilterChain</filter-name>
		<filter-class>org.springframework.web.filter.DelegatingFilterProxy
                </filter-class>
	</filter>

	<filter-mapping>
		<filter-name>springSecurityFilterChain</filter-name>
		<url-pattern>/*</url-pattern>
	</filter-mapping>
6. Spring MVC配置
6.1 這是一個配置類, 定義視圖技術和導入上述 SecurityConfig.java.
package com.zaixian.config;

import org.springframework.context.annotation.Bean;
import org.springframework.context.annotation.ComponentScan;
import org.springframework.context.annotation.Configuration;
import org.springframework.context.annotation.Import;
import org.springframework.web.servlet.config.annotation.EnableWebMvc;
import org.springframework.web.servlet.view.InternalResourceViewResolver;
import org.springframework.web.servlet.view.JstlView;

@EnableWebMvc
@Configuration
@ComponentScan({ "com.zaixian.web.*" })
@Import({ SecurityConfig.class })
public class AppConfig {

	@Bean
	public InternalResourceViewResolver viewResolver() {
		InternalResourceViewResolver viewResolver
                          = new InternalResourceViewResolver();
		viewResolver.setViewClass(JstlView.class);
		viewResolver.setPrefix("/WEB-INF/pages/");
		viewResolver.setSuffix(".jsp");
		return viewResolver;
	}

}
這將等同於以下 Spring XML檔:
<context:component-scan base-package="com.zaixian.web.*" />

	<bean
		class="org.springframework.web.servlet.view.InternalResourceViewResolver">
		<property name="prefix">
			<value>/WEB-INF/pages/</value>
		</property>
		<property name="suffix">
			<value>.jsp</value>
		</property>
	</bean>
6.2 創建一個 Initializer 類來加載所有的一切,如下代碼:
package com.zaixian.config.core;

import org.springframework.web.servlet.support.AbstractAnnotationConfigDispatcherServletInitializer;
import com.zaixian.config.AppConfig;

public class SpringMvcInitializer
       extends AbstractAnnotationConfigDispatcherServletInitializer {

	@Override
	protected Class<?>[] getRootConfigClasses() {
		return new Class[] { AppConfig.class };
	}

	@Override
	protected Class<?>[] getServletConfigClasses() {
		return null;
	}

	@Override
	protected String[] getServletMappings() {
		return new String[] { "/" };
	}

}
到這裏,實例介紹完成了,您可以參考本實例並自己親自動實踐一下體驗。
7. 示例
7.1. 打開進入歡迎頁面 – http://localhost:8080/spsecurity-helloworld-annotation/welcome 如下圖所示 -

7.2 嘗試訪問 http://localhost:8080/spsecurity-helloworld-annotation/admin 頁面,Spring Security將截取請求並重定向到 /login,並顯示一個默認的登錄表單。
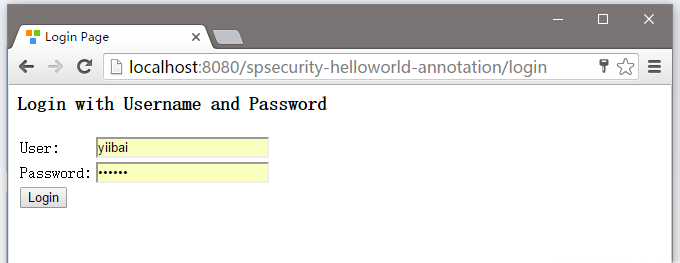
7.3. 如果用戶名和密碼不正確,將提示(顯示)錯誤資訊,並且Spring將重定向到網址:http://localhost:8080/spsecurity-helloworld-annotation/login?error.

7.4. 如果用戶名和密碼是正確的,Spring將請求重定向到原來請求的URL並顯示該網頁。

7.5.對於未經授權的用戶,Spring會顯示403拒絕訪問頁面。例如,用戶名 “zaixian” 或 “dba” 嘗試訪問 /admin 這個網址。可以看到一個禁止訪問的提示 -