Spring4 MVC入門教學
本教程是基於以下工具寫的:
- MyEclipse 10
- Spring 4.0.3.RELEASE
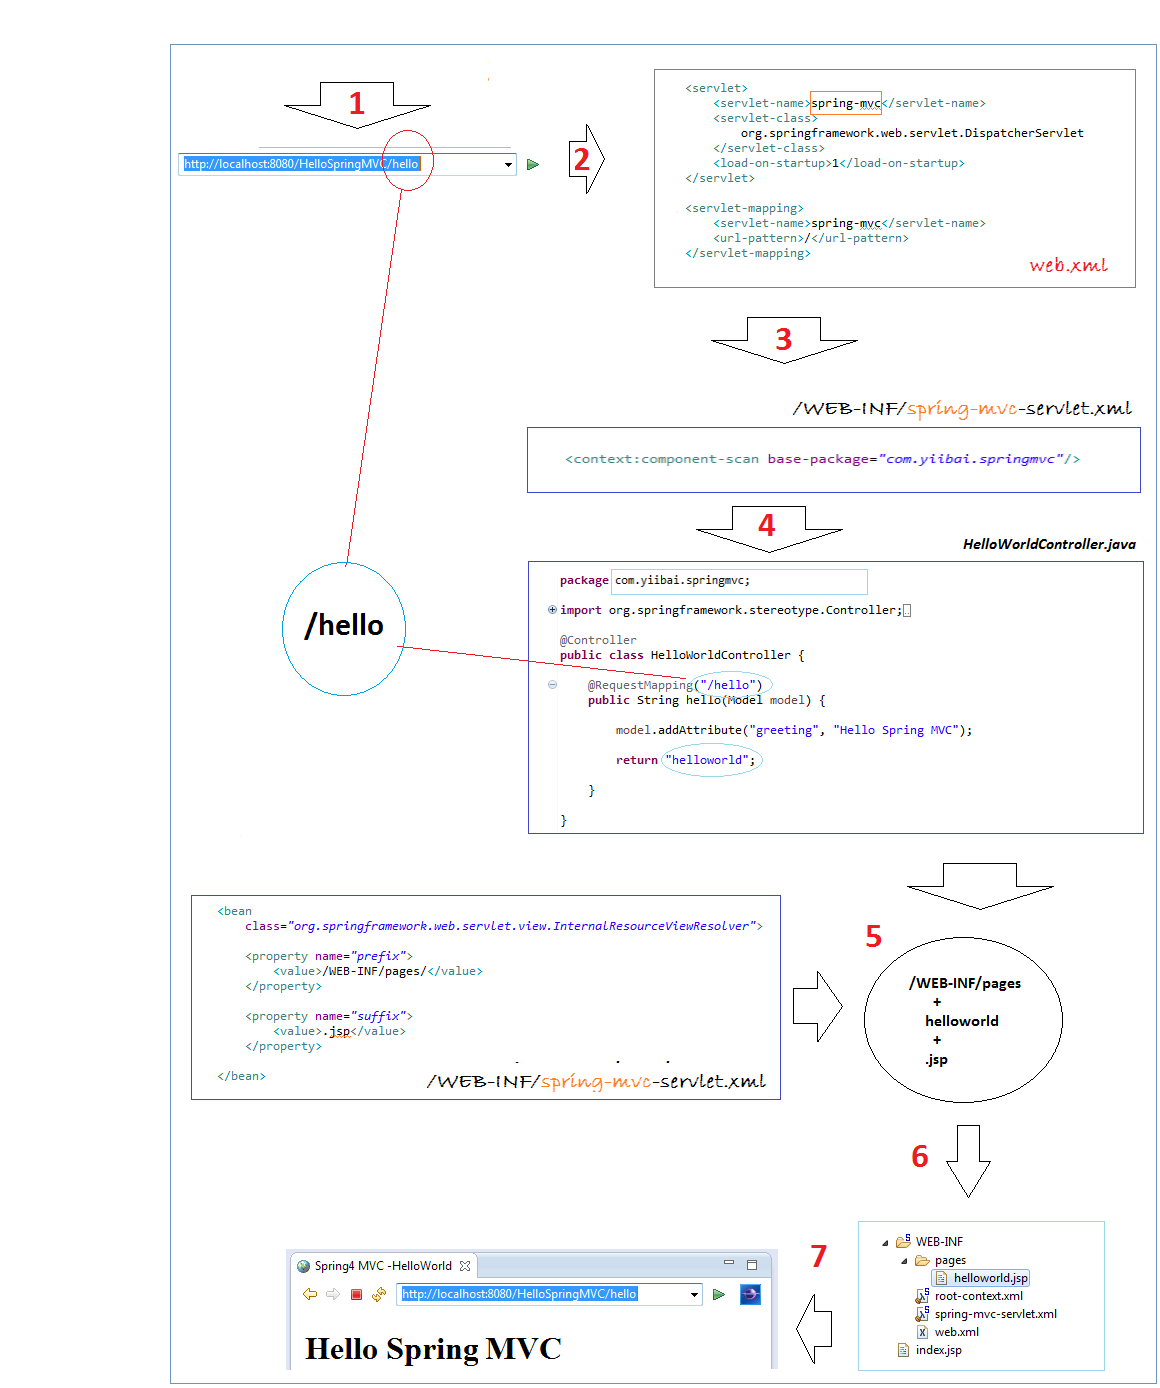
2- 預覽應用程式執行流程
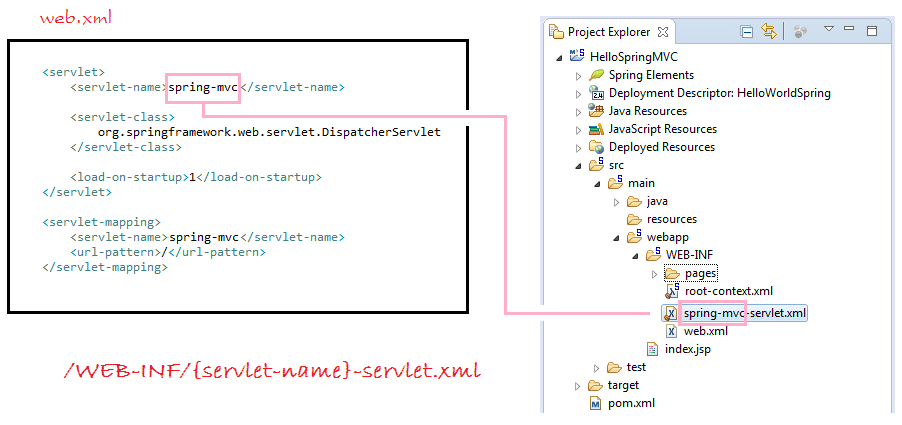
Spring MVC DispatcherServlet 讀取 xml 配置檔的原則:
-
{servlet-name} ==> /WEB-INF/{servlet-name}-servlet.xml

如果你不想用 SpringMVC 的使用原則,可以重新配置 SpringMVC DispatcherServlet 在 web.xml 檔中:
<servlet>
   <servlet-name>my-dispatcher-name</servlet-name>
   <servlet-class>org.springframework.web.servlet.DispatcherServlet</servlet-class>
   <init-param>
       <!-- override default name {servlet-name}-servlet.xml -->
       <param-name>contextConfigLocation</param-name>
       <param-value>/WEB-INF/springmvc-myconfig.xml</param-value>
   </init-param>
   <load-on-startup>1</load-on-startup>
</servlet>
應用程式的流程:
3 - 創建Maven工程
創建Maven專案類型。 Maven是幫助我們管理庫的最好方式。
在 Eclipse, 選擇 "File/New/Other..."
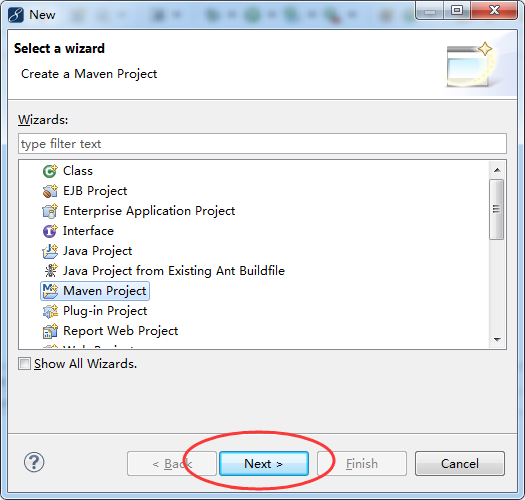
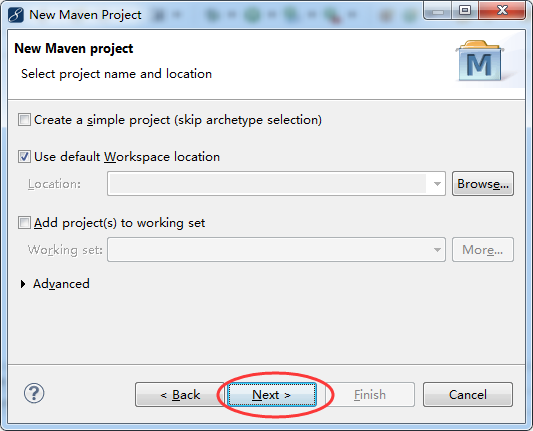
選擇 archetype "maven-archetype-webapp"。
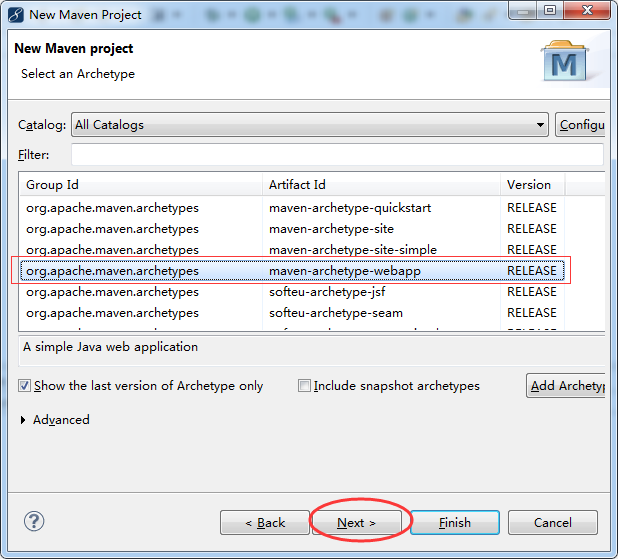
輸入:
- Group Id: com.zaixian
- Artifact Id: HelloSpringMVC
- Package: com.zaixian.springmvc
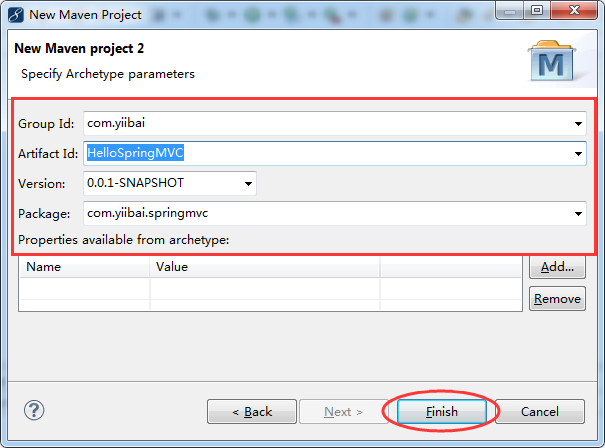
這樣將創建專案,結構如下圖所示:
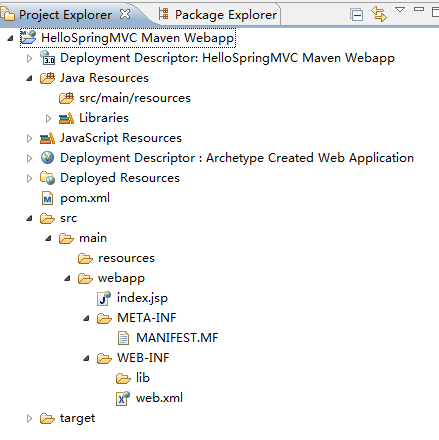
不要擔心專案在創建的時候出現錯誤資訊。原因是,現在我們還沒有聲明 Servlet 庫。
在 Eclipse 中創建 Maven 專案結構可能是錯誤的。需要我們去檢查出來並完善。
4- 配置Spring
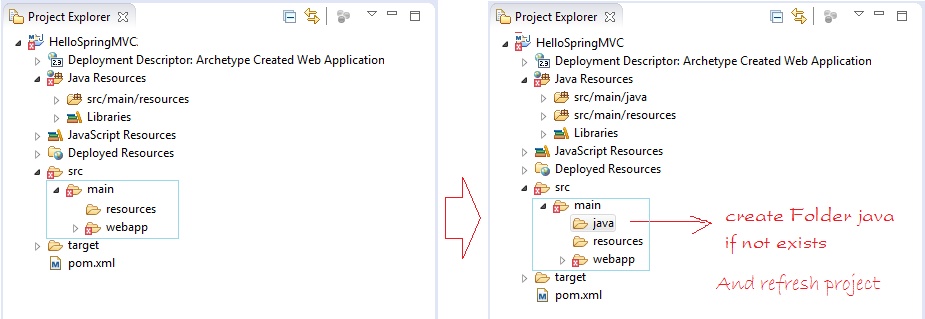
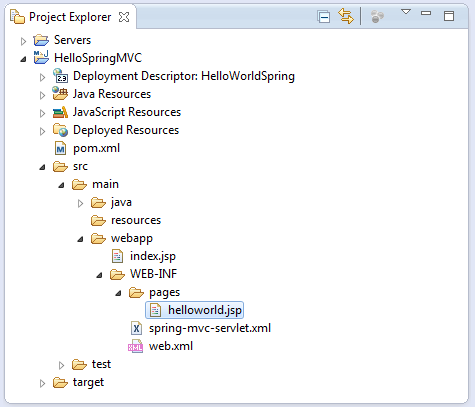
這是專案建成後的檔結構圖:
配置 Maven 使用 Spring 庫.
- pom.xml
<projectxmlns="http://maven.apache.org/POM/4.0.0"xmlns:xsi="http://www.w3.org/2001/XMLSchema-instance"
    xsi:schemaLocation="http://maven.apache.org/POM/4.0.0
     http://maven.apache.org/maven-v4_0_0.xsd">

    <modelVersion>4.0.0</modelVersion>
    <groupId>com.zaixian</groupId>
    <artifactId>HelloSpringMVC</artifactId>
    <packaging>war</packaging>
    <version>0.0.1-SNAPSHOT</version>
    <name>HelloSpringMVC Maven Webapp</name>
    <url>http://maven.apache.org</url>


    <dependencies>

        <dependency>
            <groupId>junit</groupId>
            <artifactId>junit</artifactId>
            <version>3.8.1</version>
            <scope>test</scope>
        </dependency>

        <!-- Servlet Library -->
        <!-- http://mvnrepository.com/artifact/javax.servlet/javax.servlet-api -->
        <dependency>
            <groupId>javax.servlet</groupId>
            <artifactId>javax.servlet-api</artifactId>
            <version>3.1.0</version>
            <scope>provided</scope>
        </dependency>

        <!-- Spring dependencies -->
        <!-- http://mvnrepository.com/artifact/org.springframework/spring-core -->
        <dependency>
            <groupId>org.springframework</groupId>
            <artifactId>spring-core</artifactId>
            <version>4.1.4.RELEASE</version>
        </dependency>

        <!-- http://mvnrepository.com/artifact/org.springframework/spring-web -->
        <dependency>
            <groupId>org.springframework</groupId>
            <artifactId>spring-web</artifactId>
            <version>4.1.4.RELEASE</version>
        </dependency>

        <!-- http://mvnrepository.com/artifact/org.springframework/spring-webmvc -->
        <dependency>
            <groupId>org.springframework</groupId>
            <artifactId>spring-webmvc</artifactId>
            <version>4.1.4.RELEASE</version>
        </dependency>

    </dependencies>

    <build>
        <finalName>HelloSpringMVC</finalName>
        <plugins>

            <!-- Config: Maven Tomcat Plugin -->
            <!-- http://mvnrepository.com/artifact/org.apache.tomcat.maven/tomcat7-maven-plugin -->
            <plugin>
                <groupId>org.apache.tomcat.maven</groupId>
                <artifactId>tomcat7-maven-plugin</artifactId>
                <version>2.2</version>
                <!-- Config: contextPath and Port (Default - /HelloSpringMVC : 8080) -->
                <!--
                <configuration>
                    <path>/</path>
                    <port>8899</port>
                </configuration>
                -->
            </plugin>
        </plugins>
    </build>

</project>
配置 web.xml:
<web-app xmlns:xsi="http://www.w3.org/2001/XMLSchema-instance"
   xmlns="http://java.sun.com/xml/ns/javaee"
   xsi:schemaLocation="http://java.sun.com/xml/ns/javaeehttp://java.sun.com/xml/ns/javaee/web-app_3_0.xsd"
   id="WebApp_ID" version="3.0">

   <display-name>HelloWorldSpring</display-name>

   <servlet>
       <servlet-name>spring-mvc</servlet-name>
       <servlet-class>
           org.springframework.web.servlet.DispatcherServlet
       </servlet-class>
       <load-on-startup>1</load-on-startup>
   </servlet>

   <servlet-mapping>
       <servlet-name>spring-mvc</servlet-name>
       <url-pattern>/</url-pattern>
   </servlet-mapping>

    <!-- Other XML Configuration -->
   <!-- Load by Spring ContextLoaderListener -->
   <context-param>
       <param-name>contextConfigLocation</param-name>
       <param-value>/WEB-INF/root-context.xml</param-value>
   </context-param>


    <!-- Spring ContextLoaderListener -->
   <listener>
       <listener-class>org.springframework.web.context.ContextLoaderListener</listener-class>
   </listener>

</web-app>
-
{servlet-name} ==> /WEB-INF/{servlet-name}-servlet.xml
- spring-mvc-servlet.xml
<?xml version="1.0"encoding="UTF-8"?>
<beans xmlns="http://www.springframework.org/schema/beans"
    xmlns:xsi="http://www.w3.org/2001/XMLSchema-instance"
    xmlns:p="http://www.springframework.org/schema/p"
    xmlns:context="http://www.springframework.org/schema/context"
    xmlns:mvc="http://www.springframework.org/schema/mvc"
    xsi:schemaLocation="http://www.springframework.org/schema/beans
      http://www.springframework.org/schema/beans/spring-beans-4.1.xsd
      http://www.springframework.org/schema/context
      http://www.springframework.org/schema/context/spring-context-4.1.xsd
      http://www.springframework.org/schema/mvc
      http://www.springframework.org/schema/mvc/spring-mvc-4.1.xsd">

   <context:component-scan base-package="com.zaixian.tutorial.springmvc"/>

   <context:annotation-config/>

   <bean
       class="org.springframework.web.servlet.view.InternalResourceViewResolver">

       <property name="prefix">
           <value>/WEB-INF/pages/</value>
       </property>

       <property name="suffix">
           <value>.jsp</value>
       </property>

   </bean>

</beans>
在Spring應用程式 ContextLoaderListener 將讀取其他 XML 配置檔(如下的 abc.xml 和 root-context.xml 兩個檔)。 可能不需要配置 ContextLoaderListener,如果你的應用程式並不需要讀取其他XML配置檔。
<!-- web.xml -->
<!-- Spring ContextLoaderListener -->
<listener>
<listener-class>org.springframework.web.context.ContextLoaderListener</listener-class>
</listener>

<!-- Load by Spring ContextLoaderListener -->
<context-param>
<param-name>contextConfigLocation</param-name>
<param-value>
       /WEB-INF/root-context.xml,
       /WEB-INF/abc.xml
 </param-value>
</context-param>
- /WEB-INF/root-context.xml
<?xml version="1.0" encoding="UTF-8"?>
<beans xmlns="http://www.springframework.org/schema/beans"
   xmlns:xsi="http://www.w3.org/2001/XMLSchema-instance"
   xsi:schemaLocation="http://www.springframework.org/schema/beans
   http://www.springframework.org/schema/beans/spring-beans.xsd">

  <!-- Empty -->

</beans>
- HelloWorldController.java
package com.zaixian.springmvc;

import org.springframework.stereotype.Controller;
import org.springframework.ui.Model;
import org.springframework.web.bind.annotation.RequestMapping;

@Controller
public class HelloWorldController {

    @RequestMapping("/hello")
    public String hello(Model model) {

        model.addAttribute("greeting", "Hello Spring MVC");

        return"helloworld";

    }

}
- helloworld.jsp
<%@ page language="java" contentType="text/html; charset=UTF-8"  pageEncoding="UTF-8"%>
<!DOCTYPE html PUBLIC "-//W3C//DTD HTML 4.01 Transitional//EN" "http://www.w3.org/TR/html4/loose.dtd">
<html>
<head>
<meta http-equiv="Content-Type" content="text/html; charset=UTF-8">
<title>Spring4 MVC -HelloWorld</title>
</head>
<body>
    <h1>${greeting}</h1>
</body>
</html>
5- 運行Spring應用程式
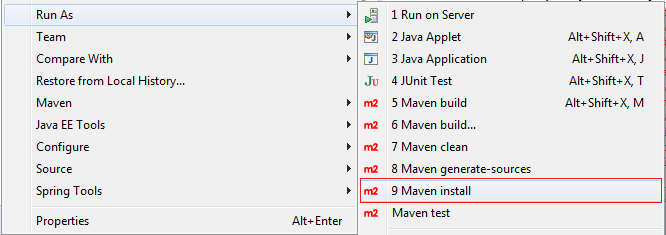
首先,運行應用程式之前,需要構建整個專案。
右鍵單擊該專案並選擇:
- Run As/Maven install
運行配置:
運行配置:
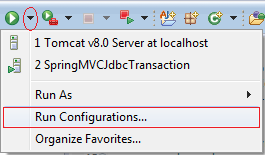
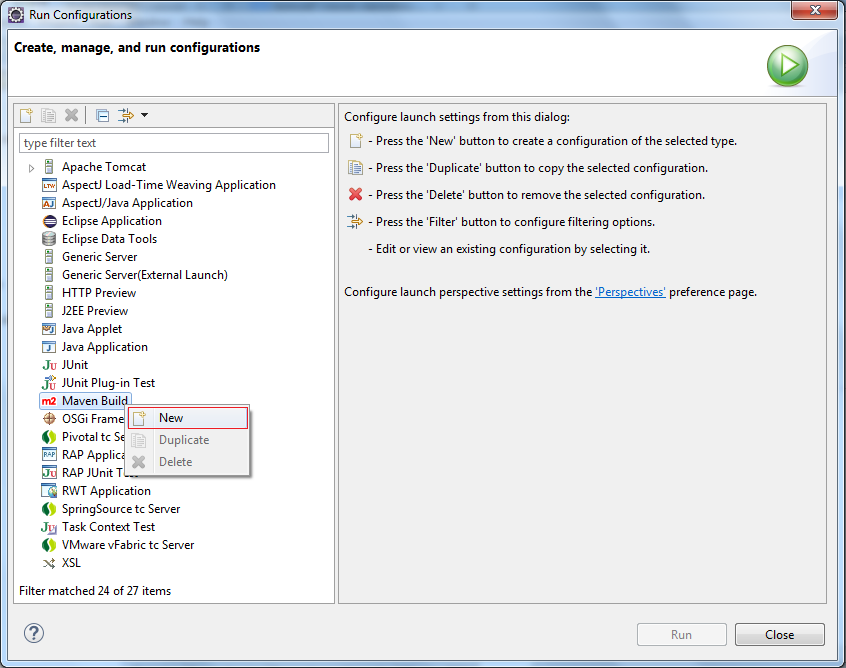
輸入:
- Name: Run HelloSpringMVC
- Base directory: ${workspace_loc:/HelloSpringMVC} =>${workspace_loc:/HelloSpringMVC Maven Webapp}
- Goals: tomcat7:run
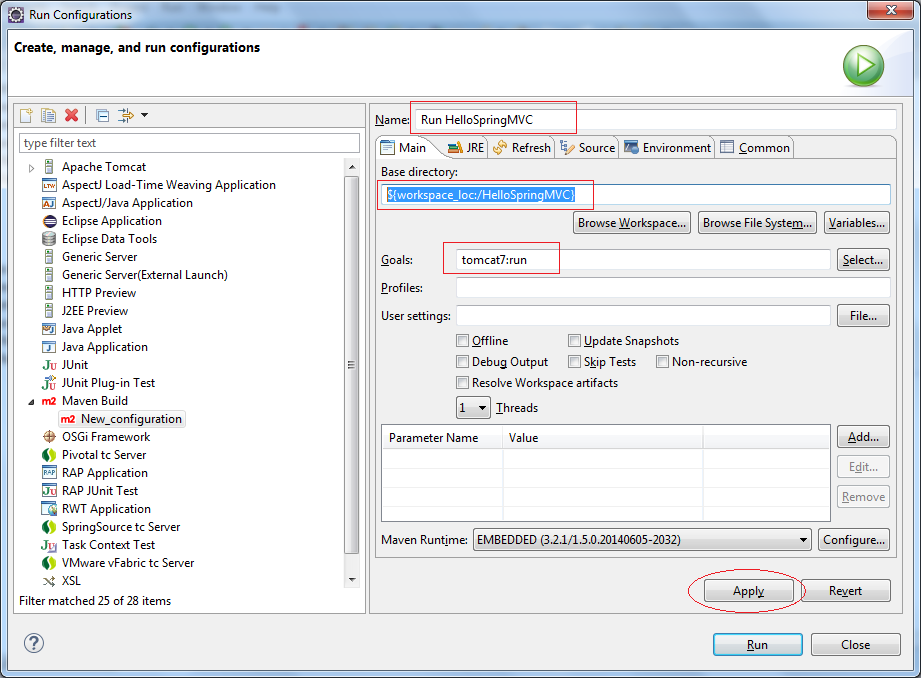
點擊Run:
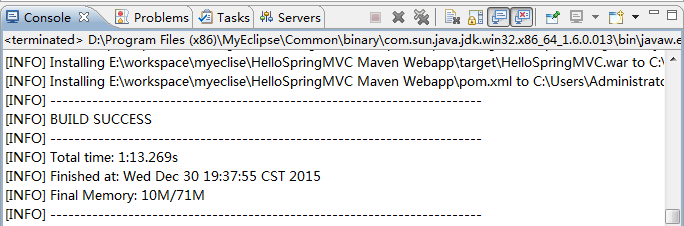
第一次運行該程式將需要幾分鐘(看你的網速),它需要下載 Tomcat 插件庫才能運行。
一切準備就緒:
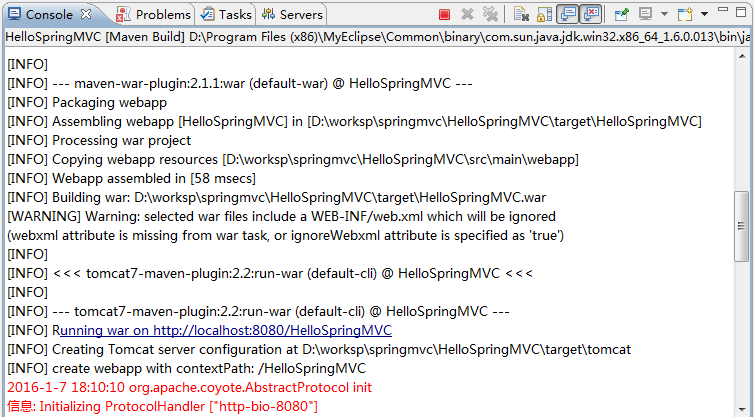
運行URL,如下圖:
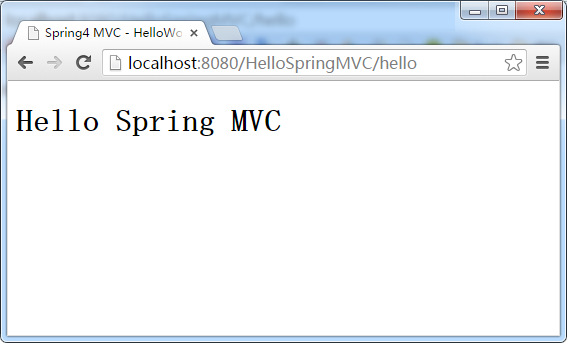
6 - 應用程式的流程
完成您的專案後,並成功地在上一步中運行。現在,我們來看一看程式的運行方式。
7- 控制器和方法
7.1- HttpServletRequest & HttpServletResponse
可以使用 HttpServletRequest, HttpServletResponse 在控制器的方法中。
- OtherExampleController.java
package com.zaixian.springmvc;

import javax.servlet.http.HttpServletRequest;
import javax.servlet.http.HttpServletResponse;

import org.springframework.stereotype.Controller;
import org.springframework.ui.Model;
import org.springframework.web.bind.annotation.PathVariable;
import org.springframework.web.bind.annotation.RequestMapping;
import org.springframework.web.bind.annotation.RequestParam;

@Controller
public class OtherExampleController {

   ......

   @RequestMapping("/somePath")
   public String requestResponseExample(HttpServletRequest request,
           HttpServletResponse reponses, Model model) {

       // Todo something here

       return "someView";
   }

   ......
}
7.2- 控制器中的重定向
使用首碼 "redirect:" ,該方法返回字串,可以重定向到另一頁面。參見圖:
- RedirectExampleController.java
package com.zaixian.springmvc;

import org.springframework.stereotype.Controller;
import org.springframework.ui.Model;
import org.springframework.web.bind.annotation.RequestMapping;
import org.springframework.web.bind.annotation.RequestMethod;

@Controller
public class RedirectExampleController {

    @RequestMapping(value = "/redirect", method = RequestMethod.GET)
    public String authorInfo(Model model) {

       // Do somethong here

        return "redirect:/hello";
    }
}
運行URL:

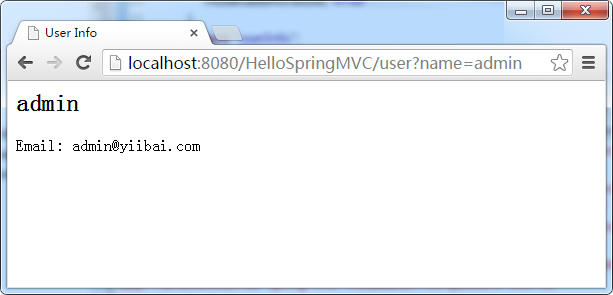
7.3- @RequestParam示例
使用@RequestParam 注解將請求參數綁定到你的控制器方法參數。
下麵的代碼片段顯示了這個用法:
- RequestParamExampleController.java
package com.zaixian.springmvc;

import org.springframework.stereotype.Controller;
import org.springframework.ui.Model;
import org.springframework.web.bind.annotation.RequestMapping;
import org.springframework.web.bind.annotation.RequestParam;

@Controller
public class RequestParamExampleController {

    @RequestMapping("/user")
    public String userInfo(Model model,
            @RequestParam(value = "name", defaultValue = "Guest") String name) {

        model.addAttribute("name", name);

        if("admin".equals(name)) {
            model.addAttribute("email", "admin@xuhuhu.com");
        } else{
            model.addAttribute("email", "Not set");
        }
        return "userInfo";
    }

}
- /WEB-INF/pages/userInfo.jsp
<html>
<head>
<meta http-equiv="Content-Type" content="text/html; charset=utf-8">
<title>User Info</title>
</head>
<body>

   <h2>${name}</h2>

   Email: ${email}
   <br>
</body>
</html>
運行 URL:
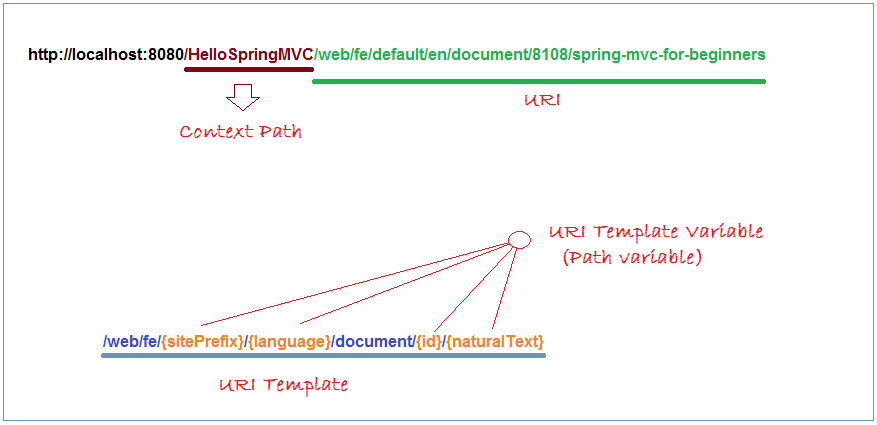
7.4- @PathVariable示例
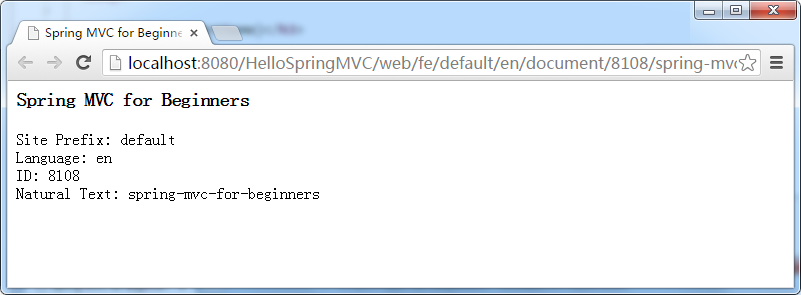
在Spring MVC中,可以使用@PathVariable注釋將一個方法參數綁定到一個URI範本變數的值:
例如,這是一個範本的URI:
- /web/fe/{sitePrefix}/{language}/document/{id}/{naturalText}
而下麵的 URI 範本匹配上面:
- /web/fe/default/en/document/8108/spring-mvc-for-beginners
- /web/fe/default/vi/document/8108/spring-mvc-cho-nguoi-moi-bat-dau
- .....
下麵的代碼片段顯示了用法:
- PathVariableExampleController.java
package com.zaixian.springmvc;

import org.springframework.stereotype.Controller;
import org.springframework.ui.Model;
import org.springframework.web.bind.annotation.PathVariable;
import org.springframework.web.bind.annotation.RequestMapping;

@Controller
public class PathVariableExampleController {


    /**
     * @PathVariable Example:
     *
     */
    @RequestMapping("/web/fe/{sitePrefix}/{language}/document/{id}/{naturalText}")
    public String documentView(Model model,
            @PathVariable(value = "sitePrefix") String sitePrefix,
            @PathVariable(value = "language") String language,
            @PathVariable(value = "id") Long id,
            @PathVariable(value = "naturalText") String naturalText) {

        model.addAttribute("sitePrefix", sitePrefix);
        model.addAttribute("language", language);
        model.addAttribute("id", id);
        model.addAttribute("naturalText", naturalText);

        String documentName = "Java tutorial for Beginners";
        if(id == 8108) {
            documentName = "Spring MVC for Beginners";
        }

        model.addAttribute("documentName", documentName);

        return "documentView";
    }
}
- /WEB-INF/pages/documentView.jsp
<html>
<head>
<meta http-equiv="Content-Type" content="text/html; charset=utf-8">
<title>${documentName}</title>
</head>
<body>

    <h3>${documentName}</h3>

    Site Prefix: ${sitePrefix}
    <br> Language: ${language}
    <br> ID: ${id}
    <br> Natural Text: ${naturalText}
    <br>

</body>
</html>
運行 URL:
7.5- @ResponseBody示例
如果您使用 @ResponseBody 注釋到方法, spring 將嘗試轉換它的返回值,並自動寫入到HTTP回應。在這種情況下,並不需要一個特定的視圖。
注:方法不一定需要返回字串類型。
使用@ResponseBody和方法返回字串的簡單例子。
- ResponseBodyExample1Controller.java
package com.zaixian.springmvc;

import org.springframework.stereotype.Controller;
import org.springframework.ui.Model;
import org.springframework.web.bind.annotation.RequestMapping;
import org.springframework.web.bind.annotation.ResponseBody;

@Controller
public class ResponseBodyExample1Controller {

    // Simple example, method returns String.
    @RequestMapping(value = "/saveResult")
    @ResponseBody
    publicString authorInfo(Model model) {
        return "saved";
    }


}
運行示例的結果:

使用@ResponseBody 的一個例子,方法返回一個對象。
代碼下載:http://pan.baidu.com/s/1mgYKoA0
上一篇:
下一篇:
Spring4 MVC HelloWorld 注解和JavaConfig實例