介紹
應用程式內購買用於購買額外內容或應用方面的升級功能。
涉及的步驟
1. 在iTunes連接,確保您擁有一個獨特的應用程式ID和相應的配置檔捆綁ID和代碼簽名在Xcode,當我們創建應用程式更新。
2. 創建一個新的應用和更新應用程式的資訊。可以瞭解這個蘋果添加新的應用程式文檔。
3. 添加一個新的產品,在管理應用程式內購買在應用程式的頁面應用程式內購買。
4.確保您設置銀行為您的應用程式的詳細資訊。這需要應用程式內購買的設置工作。還可以創建一個測試用戶帳戶使用管理用戶“選項,應用程式在iTunes連接頁面。
5. 接下來的步驟是處理代碼和創建用戶介面為我們的應用程式內購買。
6. 創建一個單獨視圖應用程式並進入包識別字指定的識別字在iTunes連接。
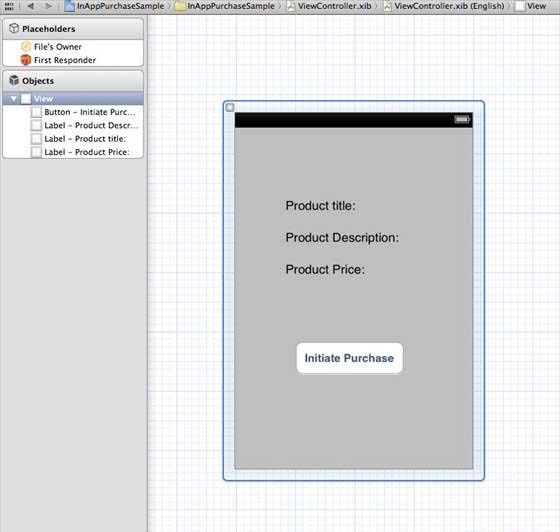
7. 更新 ViewController.xib 內容如下所示:

8. 創建三個IBOutlets 標籤的命名分別為productDescriptionLabel productTitleLabel,productPriceLabel 和 purchaseButton 按鈕。
9. 選擇專案檔,然後選擇目標,然後添加StoreKit.framework。
10. 更新 ViewController.h 如下所示.
#import <UIKit/UIKit.h>
#import <StoreKit/StoreKit.h>

@interface ViewController : UIViewController<
SKProductsRequestDelegate,SKPaymentTransactionObserver>
{
    SKProductsRequest *productsRequest;
    NSArray *validProducts;
    UIActivityIndicatorView *activityIndicatorView;
    IBOutlet UILabel *productTitleLabel;
    IBOutlet UILabel *productDescriptionLabel;
    IBOutlet UILabel *productPriceLabel;
    IBOutlet UIButton *purchaseButton;
}
- (void)fetchAvailableProducts;
- (BOOL)canMakePurchases;
- (void)purchaseMyProduct:(SKProduct*)product;
- (IBAction)purchase:(id)sender;

@end
11. 更新ViewController.m 如下所示
#import "ViewController.h"
#define kTutorialzaixianProductID
@"com.tutorialzaixians.testApp.testProduct"

@interface ViewController ()

@end

@implementation ViewController

- (void)viewDidLoad
{
    [super viewDidLoad];
    // Adding activity indicator
    activityIndicatorView = [[UIActivityIndicatorView alloc]
    initWithActivityIndicatorStyle:UIActivityIndicatorViewStyleWhiteLarge];
    activityIndicatorView.center = self.view.center;
    [activityIndicatorView hidesWhenStopped];
    [self.view addSubview:activityIndicatorView];
    [activityIndicatorView startAnimating];
    //Hide purchase button initially
    purchaseButton.hidden = YES;
    [self fetchAvailableProducts];
}

- (void)didReceiveMemoryWarning
{
    [super didReceiveMemoryWarning];
    // Dispose of any resources that can be recreated.
}

-(void)fetchAvailableProducts{
    NSSet *productIdentifiers = [NSSet
    setWithObjects:kTutorialzaixianProductID,nil];
    productsRequest = [[SKProductsRequest alloc]
    initWithProductIdentifiers:productIdentifiers];
    productsRequest.delegate = self;
    [productsRequest start];
}

- (BOOL)canMakePurchases
{
    return [SKPaymentQueue canMakePayments];
}
- (void)purchaseMyProduct:(SKProduct*)product{
    if ([self canMakePurchases]) {
        SKPayment *payment = [SKPayment paymentWithProduct:product];
        [[SKPaymentQueue defaultQueue] addTransactionObserver:self];
        [[SKPaymentQueue defaultQueue] addPayment:payment];
    }
    else{
        UIAlertView *alertView = [[UIAlertView alloc]initWithTitle:
        @"Purchases are disabled in your device" message:nil delegate:
        self cancelButtonTitle:@"Ok" otherButtonTitles: nil];
        [alertView show];
    }
}
-(IBAction)purchase:(id)sender{
    [self purchaseMyProduct:[validProducts objectAtIndex:0]];
    purchaseButton.enabled = NO;
}

#pragma mark StoreKit Delegate

-(void)paymentQueue:(SKPaymentQueue *)queue
 updatedTransactions:(NSArray *)transactions {
    for (SKPaymentTransaction *transaction in transactions) {
        switch (transaction.transactionState) {
            case SKPaymentTransactionStatePurchasing:
                    NSLog(@"Purchasing");
                break;
            case SKPaymentTransactionStatePurchased:
               if ([transaction.payment.productIdentifier
                  isEqualToString:kTutorialzaixianProductID]) {
                   NSLog(@"Purchased ");
                   UIAlertView *alertView = [[UIAlertView alloc]initWithTitle:
                   @"Purchase is completed succesfully" message:nil delegate:
                   self cancelButtonTitle:@"Ok" otherButtonTitles: nil];
                   [alertView show];
                }
                [[SKPaymentQueue defaultQueue] finishTransaction:transaction];
                break;
            case SKPaymentTransactionStateRestored:
                NSLog(@"Restored ");
                [[SKPaymentQueue defaultQueue] finishTransaction:transaction];
                break;
            case SKPaymentTransactionStateFailed:
                NSLog(@"Purchase failed ");
                break;
            default:
                break;
        }
    }
}

-(void)productsRequest:(SKProductsRequest *)request
 didReceiveResponse:(SKProductsResponse *)response
{
    SKProduct *validProduct = nil;
    int count = [response.products count];
    if (count>0) {
        validProducts = response.products;
        validProduct = [response.products objectAtIndex:0];
        if ([validProduct.productIdentifier
           isEqualToString:kTutorialzaixianProductID]) {
            [productTitleLabel setText:[NSString stringWithFormat:
            @"Product Title: %@",validProduct.localizedTitle]];
            [productDescriptionLabel setText:[NSString stringWithFormat:
            @"Product Desc: %@",validProduct.localizedDescription]];
            [productPriceLabel setText:[NSString stringWithFormat:
            @"Product Price: %@",validProduct.price]];
        }
    } else {
        UIAlertView *tmp = [[UIAlertView alloc]
                            initWithTitle:@"Not Available"
                            message:@"No products to purchase"
                            delegate:self
                            cancelButtonTitle:nil
                            otherButtonTitles:@"Ok", nil];
        [tmp show];
    }
    [activityIndicatorView stopAnimating];
    purchaseButton.hidden = NO;
}

@end
注意事項:
創建在應用程式內購買的ProductID更新kTutorialzaixianProductID。可以添加一個以上的產品通過更新productIdentifiers的NSSet fetchAvailableProducts。同樣處理產品ID添加購買相關動作。
輸出
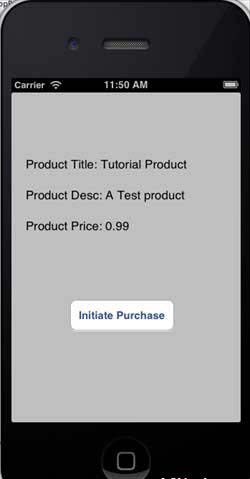
現在,當我們運行程式時,我們會得到下麵的輸出。

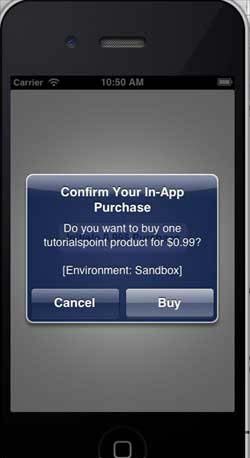
請確定登錄您的帳戶設置螢幕。在點擊啟動購買請選擇“使用現有的Apple ID。輸入您的有效的測試帳戶的用戶名和密碼。在幾秒鐘內將顯示以下警告。

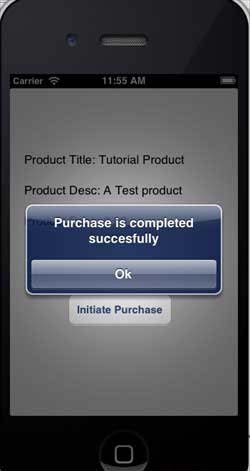
所購買的產品一旦成功,會得到以下警示。可以更新顯示此警報的應用程式功能的相關代碼。

