擴展是在Yii中的應用中專門設計使用的包。你可以分享自己的代碼作為一個擴展或使用第三方擴展功能添加到您的應用程式中。
使用擴展
大多數擴展分發作為 Composer 包。Composer 從Packagist安裝軟體包 - Composer 包庫。
要安裝第三方擴展,應該 -
-
添加擴展到composer.json檔。
-
運行 composer 安裝。
添加日期和時間窗口小部件
讓我們添加一個整潔的日期時間窗口小部件到專案中。
第1步- 使用以下方式修改基本的應用程式範本中的composer.json檔。
{
   "name": "yiisoft/yii2-app-basic",
   "description": "Yii 2 Basic Project Template",
   "keywords": ["yii2", "framework", "basic", "project template"],
   "homepage": "http://www.yiiframework.com/",
   "type": "project",
   "license": "BSD-3-Clause",
   "support": {
      "issues": "https://github.com/yiisoft/yii2/issues?state=open",
      "forum": "http://www.yiiframework.com/forum/",
      "wiki": "http://www.yiiframework.com/wiki/",
      "irc": "irc://irc.freenode.net/yii",
      "source": "https://github.com/yiisoft/yii2"
   },
   "minimum-stability": "stable",
   "require": {
      "php": ">=5.4.0",
      "yiisoft/yii2": ">=2.0.5",
      "yiisoft/yii2-bootstrap": "*",
      "yiisoft/yii2-swiftmailer": "*",
      "kartik-v/yii2-widget-datetimepicker": "*"
   },
   "require-dev": {
      "yiisoft/yii2-codeception": "*",
      "yiisoft/yii2-debug": "*",
      "yiisoft/yii2-gii": "*",
      "yiisoft/yii2-faker": "*"
   },
   "config": {
      "process-timeout": 1800
   },
   "scripts": {
      "post-create-project-cmd": [
         "yii\\composer\\Installer::postCreateProject"
      ]
   },
   "extra": {
      "yii\\composer\\Installer::postCreateProject": {
         "setPermission": [
            {
               "runtime": "0777",
               "web/assets": "0777",
               "yii": "0755"
            }
         ],
         "generateCookieValidationKey": [
            "config/web.php"
         ]
      },
      "asset-installer-paths": {
         "npm-asset-library": "vendor/npm",
         "bower-asset-library": "vendor/bower"
      }
   }
}
我們已經添加了依賴 "kartik-v/yii2-widget-datetimepicker": "*" 到必需(required)部分。
第2步 - 現在,專案的根裏面,運行 composer update 來更新所有的依賴。

我們剛剛安裝擴展。你會在 vendor/kartik-v/yii2widget-datetimepicker 檔夾的 DateTimePicker 裏面找到。
第3步 - 要在頁面中顯示新安裝的小工具,修改 SiteController 的 actionAbout 方法對應的 About 視圖 。
<?php
   /* @var $this yii\web\View */
   use kartik\datetime\DateTimePicker;
   use yii\helpers\Html;
   $this->title = 'About';
   $this->params['breadcrumbs'][] = $this->title;
   $this->registerMetaTag(['name' => 'keywords', 'content' => 'yii, developing, views,
      meta, tags']);
   $this->registerMetaTag(['name' => 'description',
      'content' => 'This is the description of this page!'], 'description');
?>
<div class="site-about">
   <h1><?= Html::encode($this->title) ?></h1>
   <p>
      This is the About page. You may modify the following file to customize its content:
   </p>
   <?php
      echo DateTimePicker::widget([
         'name' => 'dp_1',
         'type' => DateTimePicker::TYPE_INPUT,
         'value' => '1992-10-12 10:10',
         'pluginOptions' => [
            'autoclose'=>true,
            'format' => 'yyyy-mm-dd hh:ii'
         ]
      ]);
   ?>
</div>
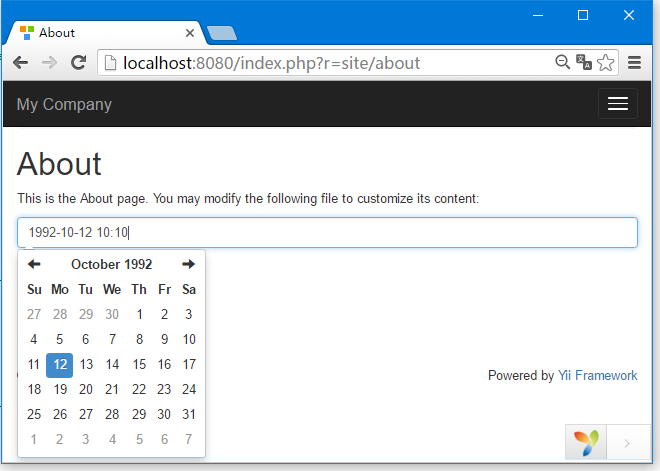
第4步 - 現在,運行PHP專案根下的內置 PHP伺服器 php -S localhost:8080t web 命令。
第5步 - 在流覽器中打開URL=> http://localhost:8080/index.php?r=site/about. 你會看到一個整潔的DateTimePicker,如下面的螢幕截圖。
上一篇:
Yii Asset轉換
下一篇:
Yii創建擴展