主題化可以幫助你更換一組視圖,而不需要修改原來的視圖檔。應該設置視圖應用程式組件的 theme 屬性來使用主題。
也應該定義以下屬性 -
-
yii\base\Theme::$basePath − 定義 CSS, JS, images 的基本目錄等等
-
yii\base\Theme::$baseUrl − 定義主題資源的基本URL
-
yii\base\Theme::$pathMap − 定義替換規則
例如,如果在 UserController 中調用 $this->render('create') , @app/views/user/create.php 視圖檔將被渲染。
如果下麵的應用配置主題化,視圖檔 @app/themes/basic/user/create.php 將渲染代替。
第1步 - 修改 config/web.php 檔使用以下代碼。
<?php
   $params = require(__DIR__ . '/params.php');
   $config = [
      'id' => 'basic',
      'basePath' => dirname(__DIR__),
      'bootstrap' => ['log'],
      'components' => [
         'request' => [
            // !!! insert a secret key in the following (if it is empty) - this
               //is required by cookie validation
            'cookieValidationKey' => 'sfdsajkljfkldsajkfldsa-xuhuhu.com-dsaf ',
         ],
         'cache' => [
            'class' => 'yii\caching\FileCache',
         ],
         'user' => [
            'identityClass' => 'app\models\User',
            'enableAutoLogin' => true,
         ],
         'errorHandler' => [
            'errorAction' => 'site/error',
         ],
         'mailer' => [
            'class' => 'yii\swiftmailer\Mailer',
            // send all mails to a file by default. You have to set
            // 'useFileTransport' to false and configure a transport
            // for the mailer to send real emails.
            'useFileTransport' => true,
         ],
         'log' => [
            'traceLevel' => YII_DEBUG ? 3 : 0,
            'targets' => [
               [
                  'class' => 'yii\log\FileTarget',
                  'levels' => ['error', 'warning'],
               ],
            ],
         ],
         'view' => [
            'theme' => [
               'basePath' => '@app/themes/basic',
               'baseUrl' => '@web/themes/basic',
               'pathMap' => [
                  '@app/views' => '@app/themes/basic',
               ],
            ],
         ],
         'db' => require(__DIR__ . '/db.php'),
      ],
      'modules' => [
         'admin' => [
            'class' => 'app\modules\admin\Admin',
         ],
      ],
      'params' => $params,
   ];
   if (YII_ENV_DEV) {
      // configuration adjustments for 'dev' environment
      $config['bootstrap'][] = 'debug';
      $config['modules']['debug'] = [
         'class' => 'yii\debug\Module',
      ];
      $config['bootstrap'][] = 'gii';
      $config['modules']['gii'] = [
         'class' => 'yii\gii\Module',
      ];
   }
   return $config;
?>
我們已經添加了視圖應用程式組件。
第2步 - 現在創建了 web/themes/basic 和 themes/basic/site 目錄結構。在 themes/basic/site 檔夾裏面創建一個 about.php 檔並使用下麵的代碼。
<?php
/* @var $this yii\web\View */
use yii\helpers\Html;
$this->title = 'About';
$this->params['breadcrumbs'][] = $this->title;
$this->registerMetaTag(['name' => 'keywords', 'content' => 'yii, developing,
views, meta, tags']);
$this->registerMetaTag(['name' => 'description', 'content' => 'This is the
description of this page!'], 'description');
?>
<div class = "site-about">
<h1><?= Html::encode($this->title) ?></h1>
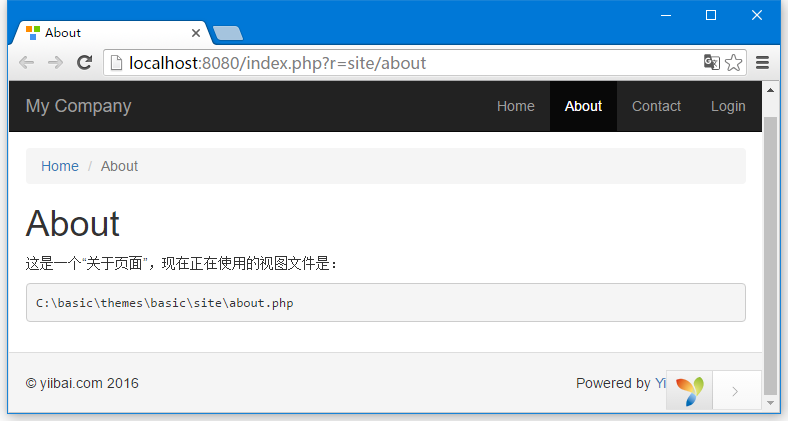
<p style = "color: red;"> 這是一個“關於頁面”,現在正在使用的視圖檔是:<pre><?php echo __FILE__;?></pre> </p>
</div>
第3步 - 現在,訪問 http://localhost:8080/index.php?r=site/about ,themes/basic/site/about.php 檔將被渲染,而不是渲染 views/site/about.php 檔。
第4步 - 到 主題模組,使用以下方式配置 yii\base\Theme::$pathMap 。
'pathMap' => [
   '@app/views' => '@app/themes/basic',
   '@app/modules' => '@app/themes/basic/modules',
],
第5步 - 到 widgets 模組,使用以下方式配置 yii\base\Theme::$pathMap 。
'pathMap' => [
   '@app/views' => '@app/themes/basic',
   '@app/widgets' => '@app/themes/basic/widgets', // <-- !!!-->
],
有時需要指定一個基本主題,它包含應用程式的基本外觀。為了實現這個目標,可以使用主題繼承。
第6步 - 修改視圖(view)應用程式組件,並使用以下代碼。
'view' => [
   'theme' => [
      'basePath' => '@app/themes/basic',
      'baseUrl' => '@web/themes/basic',
      'pathMap' => [
         '@app/views' => [
            '@app/themes/newyear',
            '@app/themes/basic',
         ],
      ]
   ],
],
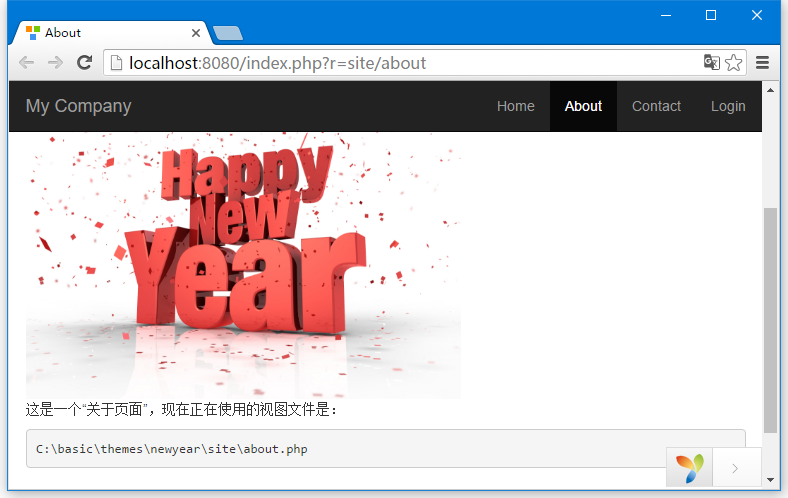
在上面的配置中,@app/views/site/index.php 或 @app/themes/newyear/site/index.php 或 @app/themes/basic/site/index.php 視圖檔將被作為主題,這取決於哪些檔存在。如果兩個檔都存在,第一個將被使用。
第7步 - 創建 themes/newyear/site 目錄結構。
第8步 - 現在 themes/newyear/site 檔夾內,創建一個 about.php 檔並用下麵的代碼。
<?php
   /* @var $this yii\web\View */
   use yii\helpers\Html;
   $this->title = 'About';
   $this->params['breadcrumbs'][] = $this->title;
   $this->registerMetaTag(['name' => 'keywords', 'content' => 'yii, developing,
      views, meta, tags']);
   $this->registerMetaTag(['name' => 'description', 'content' => 'This is the
      description of this page!'], 'description');
?>

<div class = "site-about">
   <h2>New Year Theme</h2>
   <img src = "http://www.mortimerarms.co.uk/wp-content/uploads/2016/01/new-year.jpg" alt = "新年主題"/> <p> 這是一個“關於頁面”,現在正在使用的視圖檔是:<br/><pre><?php echo __FILE__;?></pre> </p>
</div>
上一篇:
Yii資料庫遷移
下一篇:
Yii RESTful API