Yii提供一個高度可定制,可擴展的框架。
有了這個框架的幫助,就可以輕鬆地記錄各種類型的消息。
要日誌記錄資訊/消息,應該調用下麵的方法 -
-
Yii::error() − 記錄一個致命錯誤消息
-
Yii::warning() − 記錄一個警告消息
-
Yii::info() − 記錄一些有用資訊的消息
-
Yii::trace() − 記錄消息跟蹤一段代碼如何運行
在上述不同類別方法記錄日誌資訊。都具有以下函數簽名 -
function ($message, $category = 'application')
在這裏 −
-
$message − 要記錄的日誌消息
-
$category − 日誌消息類別
簡單和方便的命名方式是使用 PHP 的 __METHOD__ 魔術常量。例如 -
Yii::info('this is a log message', __METHOD__);
日誌目標是 yii\log\Target class 類的一個實例。它通過類別過濾所有日誌資訊並導出檔、資料庫和/或電子郵件。
第1步 - 也可以註冊多個日誌目標,如下:
return [
   // the "log" component is loaded during bootstrapping time
   'bootstrap' => ['log'],
   'components' => [
      'log' => [
         'targets' => [
            [
               'class' => 'yii\log\DbTarget',
               'levels' => ['error', 'warning', 'trace', 'info'],
            ],
            [
               'class' => 'yii\log\EmailTarget',
               'levels' => ['error', 'warning'],
               'categories' => ['yii\db\*'],
               'message' => [
                  'from' => ['log@mydomain.com'],
                  'to' => ['admin@mydomain.com', 'developer@mydomain.com'],
                  'subject' => 'Application errors at mydomain.com',
               ],
            ],
         ],
      ],
   ],
];
在上面的代碼,有兩個目標被註冊。第一個目標選擇了所有的錯誤,警告,跟蹤和資訊消息,並在資料庫中保存它們。第二個目標將發送所有錯誤和警告消息到管理員的電子郵件。
Yii提供以下內置日誌的目標 -
-
yii\log\DbTarget − 在資料庫中存儲日誌消息
-
yii\log\FileTarget − 在檔中保存記錄消息
-
yii\log\EmailTarget − 發送長消息到預先定義的電子郵件地址
-
yii\log\SyslogTarget − 通過調用 PHP syslog()函數將日誌資訊保存到系統日誌
默認情況下,日誌消息的格式如下 -
Timestamp [IP address][User ID][Session ID][Severity Level][Category] Message Text
第2步 - 要自定義格式則配置 yii\log\Target::$prefix 屬性。 例如。
[
   'class' => 'yii\log\FileTarget',
   'prefix' => function ($message) {
      $user = Yii::$app->has('user', true) ? Yii::$app->get('user') :
      'undefined user';
      $userID = $user ? $user->getId(false) : 'anonym';
      return "[$userID]";
   }
]
上面的代碼片段配置日誌目標,使用當前用戶ID為首碼的日誌消息。
默認情況下,日誌消息包含這些全局PHP變數的值:$_GET,$_POST,$_SESSION,$_COOKIE,$_FILES 和 $_SERVER。
若要修改此行為,則可以配置 yii\log\Target::$logVars 配置,需要包括變數名。
所有日誌資訊都保存在由記錄對象的數組。 Logger對象每次刷新記錄的消息到日誌目標,數組積累了一定數量消息(默認為1000)。
第3步 - 要自定義這個數字,則可以調用 flushInterval 屬性。
return [
   'bootstrap' => ['log'],
   'components' => [
      'log' => [
         'flushInterval' => 50, // default is 1000
         'targets' => [...],
      ],
   ],
];
即使在Logger對象刷新日誌資訊記錄的目標,它們也不會立即導出。當日志目標積累了一定數量的消息(默認為1000)時就會導出。
第4步 - 要自定義這個數字,可以配置 exportInterval 屬性的值。
[
   'class' => 'yii\log\FileTarget',
   'exportInterval' => 50, // default is 1000
]
第5步 - 現在,修改 config/web.php 檔,如下所示代碼。
<?php
   $params = require(__DIR__ . '/params.php');
   $config = [
      'id' => 'basic',
      'basePath' => dirname(__DIR__),
      'bootstrap' => ['log'],
      'components' => [
         'request' => [
            // !!! insert a secret key in the following (if it is empty) - this
               //is required by cookie validation
            'cookieValidationKey' => 'ymoaYrebZHa8gURuolioHGlK8fLXCKjO',
         ],
         'cache' => [
            'class' => 'yii\caching\FileCache',
         ],
         'user' => [
            'identityClass' => 'app\models\User',
            'enableAutoLogin' => true,
         ],
         'errorHandler' => [
            'errorAction' => 'site/error',
         ],
         'mailer' => [
            'class' => 'yii\swiftmailer\Mailer',
            // send all mails to a file by default. You have to set
            // 'useFileTransport' to false and configure a transport
            // for the mailer to send real emails.
            'useFileTransport' => true,
         ],
         'log' => [
            'flushInterval' => 1,
            'traceLevel' => YII_DEBUG ? 3 : 0,
            'targets' => [
               [
                  'class' => 'yii\log\FileTarget',
                  'exportInterval' => 1,
                  'logVars' => []
               ],
            ],
         ],
         'db' => require(__DIR__ . '/db.php'),
      ],
      'modules' => [
         'admin' => [
            'class' => 'app\modules\admin\Admin',
         ],
      ],
      'params' => $params,
   ];
   if (YII_ENV_DEV) {
      // configuration adjustments for 'dev' environment
      $config['bootstrap'][] = 'debug';
      $config['modules']['debug'] = [
         'class' => 'yii\debug\Module',
      ];
      $config['bootstrap'][] = 'gii';
      $config['modules']['gii'] = [
         'class' => 'yii\gii\Module',
      ];
   }
   return $config;
?>
在上面的代碼中,我們定義日誌應用程式組件,並設置 flushInterval 和 exportInteval 屬性的值為 1 ,以便所有日誌消息立即導出在日誌檔中。
這裏還忽略了日誌目標級別(levels )屬性。這意味著,所有類別的日誌消息(錯誤,警告,資訊,跟蹤)將會記錄在日誌檔中。
第6步 - 然後,在 SiteController 中調用 actionLog() 函數。
public function actionLog() {
   Yii::trace('trace log message');
   Yii::info('info log message');
   Yii::warning('warning log message');
   Yii::error('error log message');
}
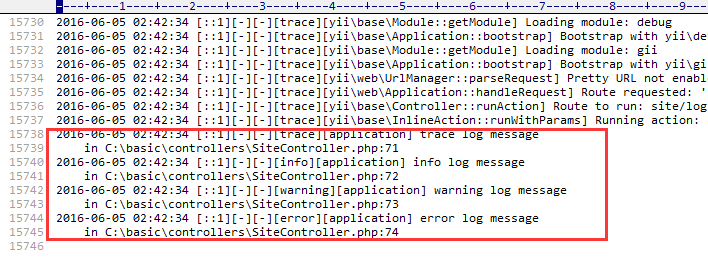
在上面的代碼中,只寫4個不同類型的日誌消息到日誌檔。
第7步 - 在Web流覽器的地址欄打開 URL http://localhost:8080/index.php?r=site/log
日誌消息出現在 app/runtime/logs 目錄下的 app.log 檔中。
上一篇:
Yii別名(Aliases)
下一篇:
Yii錯誤處理