創建視圖
<?php
   /* @var $this yii\web\View */
   use yii\helpers\Html;
   $this->title = 'About';
   $this->params['breadcrumbs'][] = $this->title;
?>
<div class="site-about">
   <h1><?= Html::encode($this->title) ?></h1>
   <p>
      This is the About page. You may modify the following file to customize its content:
   </p>
   <code><?= __FILE__ ?></code>
</div>
進行編碼和/或為了過濾從最終用戶來的數據以避免XSS攻擊。應該通過調用 yii\helpers\Html::encode() 編碼純文本,
以及調用 yii\helpers\HtmlPurifier 過濾HTML內容。
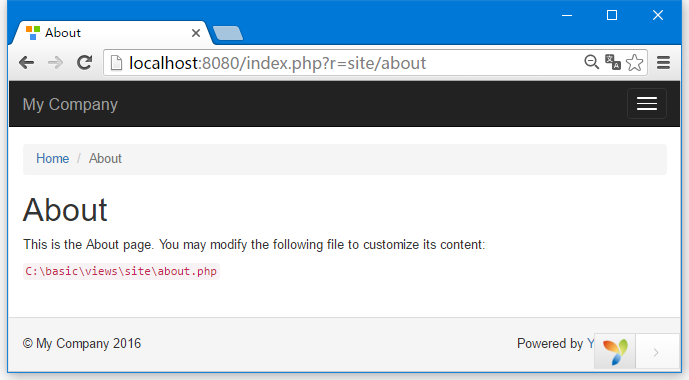
<?php
   /* @var $this yii\web\View */
   use yii\helpers\Html;
   use yii\helpers\HtmlPurifier;
   $this->title = '關於我們';
   $this->params['breadcrumbs'][] = $this->title;
?>
<div class="site-about">
   <h1><?= Html::encode($this->title) ?></h1>
   <p>
      This is the About page. You may modify the following file to customize its content:
   </p>
   <p>
      <?= Html::encode("<script>alert('alert!');</script><h1>ENCODE EXAMPLE</h1>>") ?>
   </p>
   <p>
      <?= HtmlPurifier::process("<script>alert('alert!');</script><h1> HtmlPurifier EXAMPLE</h1>") ?>
   </p>
   <code><?= __FILE__ ?></code>
</div>

請注意,Html::encode()函數中的JavaScript代碼過濾後顯示為純文本。HtmlPurifier::process()調用後,只有h1標籤顯示。
-
視圖是由控制器提供的,應該放在@app/views/controllerID檔夾中。
-
視圖是一個小窗口渲染呈現,應放入 widgetPad/ views 檔夾。
-
render() − 渲染一個視圖,並應用佈局
-
renderPartial() − 渲染視圖,但不使用佈局
-
renderAjax() − 渲染視圖但不使用佈局,但所有的注入JS和CSS檔
-
renderFile() − 在一個給定的檔路徑或別名來渲染視圖
-
renderContent() − 渲染一個靜態字串並應用佈局
-
render() − 渲染一個視圖。
-
renderAjax() − 渲染視圖但不使用佈局,但所有的注入JS和CSS檔。
-
renderFile() − 在一個給定的檔路徑或別名來渲染視圖。
第4步 - 在 views/site 檔夾裏邊,創建兩個視圖檔: _view1.php 和 _view2.php
_view1.php −
<h1>這是視圖 - _view1.php 的內容</h1>
_view2.php −
<h1>這是視圖 - _view2.php 的內容</h1>
<?php
   /* @var $this yii\web\View */
   use yii\helpers\Html;
   $this->title = '關於我們';
   $this->params['breadcrumbs'][] = $this->title;
?>
<div class="site-about">
   <h1><?= Html::encode($this->title) ?></h1>
   <p>
      This is the About page. You may modify the following file to customize its content:
   </p>
   <?= $this->render("_view1") ?>
   <?= $this->render("_view2") ?>
   <code><?= __FILE__ ?></code>
</div>

當渲染視圖,可以使用視圖名稱或視圖檔的路徑/別名來定義視圖。視圖名稱解析按以下方式 -
-
視圖名可以省略擴展名。例如,about 對應於 about.php 檔。
-
如果視圖名稱開頭“/”,那麼,如果當前活動的模組是forum,視圖名為comment/post,路徑將是 @app/modules/forum/views/comment/post。如果沒有活動的模組,路徑將是@app/views/comment/post。
-
如果視圖名稱以“//”開頭,對應的路徑是@app/views/ViewName。例如,//site/contact 對應於@app/views/site/contact.php
-
如果視圖名稱是contact,並在上下文控制器是 SiteController,那麼路徑將是 @app/views/site/contact.php。
-
如果 price 視圖要在 goods 視圖中渲染,那麼,如果它在 @app/views/invoice/goods.php 渲染,那麼 price 會被解析為 @app/views/invoice/price.php 。
在視圖中訪問數據
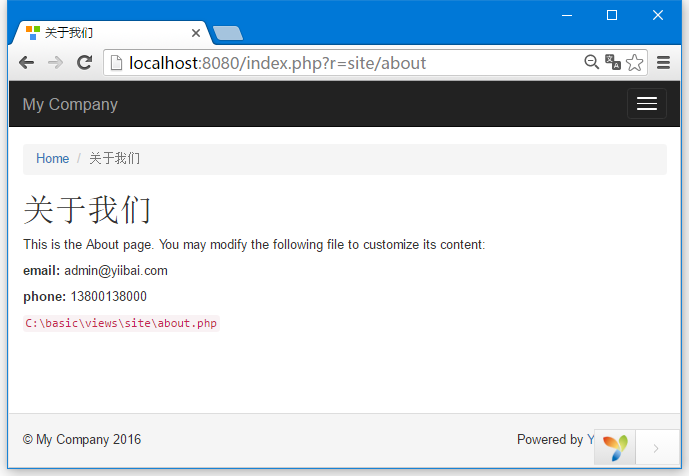
public function actionAbout() {
   $email = "admin@xuhuhu.com";
   $phone = "13800138000";
   return $this->render('about',[
      'email' => $email,
      'phone' => $phone
   ]);
}
<?php
   /* @var $this yii\web\View */
   use yii\helpers\Html;
   $this->title = '關於我們';
   $this->params['breadcrumbs'][] = $this->title;
?>
<div class = "site-about">
   <h1><?= Html::encode($this->title) ?></h1>
   <p>
      This is the About page. You may modify the following file to customize its content:
   </p>
   <p>
      <b>email:</b> <?= $email ?>
   </p>
   <p>
      <b>phone:</b> <?= $phone ?>
   </p>
   <code><?= __FILE__ ?></code>
</div>